| This page is outdated. Please update this page to reflect recent events or newly available information. Please see the talk page for more information. |
- This guide was originally created by Lisimba; formatting was added by TheSatanicSanta.
- This guide is under the Creative Commons Attribution-ShareAlike 4.0 International License
- The original guide can be found on Lisimba's website.
This how-to tells you how to make a safe and fairly cheap pebble bed High Temperature Gas Reactor using the Minecraft mods RotaryCraft and ReactorCraft. The design is suitable for people who haven’t built a reactor before and who want to get started tinkering with nuclear energy. I’m focusing on the mods as they appear in the FTB Monster pack (v.1.1.1) as that’s the one I play, but the techniques presented here should work everywhere, possibly with some minor adjustments. This howto is about how to combine the blocks into a good reactor that’ll let you progress your base into the atomic age.
Document version: 1, 9 May 2014
Intro[]
The reactor we’re building in this howto has these requirements:
- Safe: if you accidentally destroy a coolant line or forget to do maintenance, the reactor should shut down or sit there wasting fuel. At worst it might destroy some easily replacable parts. It should not turn your base into a radioactive crater. That said, there are a few pointers on how you can make your reactor more efficient but less safe.
- Fairly cheap: we’ll start building approximately the minimum you can get away with and still have a functional reactor. From there you can upgrade various components.
- Efficient: when you just enter the atomic age, you probably don’t have an abundance of fuel yet. We don’t want to waste it for no good reason.
- Understandable: I’m not just giving you a blueprint and telling you to assemble it. My aim is for you to understand what you’ve built, so you can tinker with it and upgrade it to meet your needs. However, if you care more about getting a reactor to work than about understanding how and why it works, you can skip all the sections marked with TL;DR:
If you want to get started, read on.
Prerequisites[]
Mod versions[]
I’m using the FTB Monster pack version 1.1.1, based on Minecraft 1.6.4. It contains ReactorCraft and RotaryCraft version 19b. If you use a different version or another modpack, be aware that you may have different bugs or features.
Your tech level[]
Your base’s tech level should be high enough that you can produce several stacks of HSLA Steel. You must also be able to make TRISO fuel pellets.
Biome choice[]
The biome you build your reactor in actually matters, as they can vary in ambient temperature. Most biomes have an ambient temperature of 25ºC, and this how-to assumes you’re building your reactor in such a biome. If you check the temperature of an idle piece of reactor and it shows as 25ºC, you’re fine. If it’s different you’re probably still fine, but it might just push you outside certain safety limits. Be cautious.
Layout and high level view[]
Your reactor contains several parts:
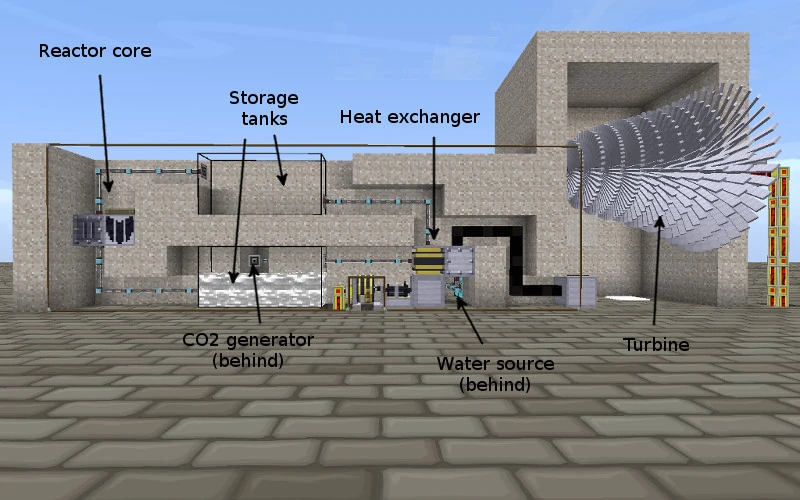
- Plumbing: CO2, water, and steam need to be moved around. Discussed insection 4.
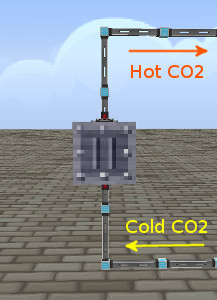
- Reactor core: this is where the action happens. Fuel pellets and cold CO2 goes in, hot CO2 comes out. It also produces spent pellets, which are waste. Contains a heat exchanger but is not the heat exchanger. Discussed in section 5.
- Heat exchanger: hot CO2 and water go in, cold CO2 and steam come out. Not to be confused with the heat exchanger in the reactor core. Discussed in section 6.
- Turbine: steam goes in, rotary power comes out. The steam also comes out again but just gets dumped as waste. Discussed in section 7.
- Water source: the heat exchanger needs a constant supply of water. Discussed in section 8.
- CO2 generator: a simple but crucial part, you need it to create your supply of CO2. As the CO2 loop is closed (it moves around but doesn’t get used up) you only have to run it when you’re first starting up the reactor. [D] Discussed in section 9.
- Storage tanks (optional): it’s useful to have storage tanks for the hot and cold CO2, to act as buffers and to let you see at a glance how much of each you have. A hot CO2 tank also makes a decent “battery”. Discussed in section 10.
- Condenser (optional): you could use one of these to turn steam back into water and close the H2O loop as well. Since water is so easy to get by, I’m not going to bother with them.
You’ll also have several moving parts.
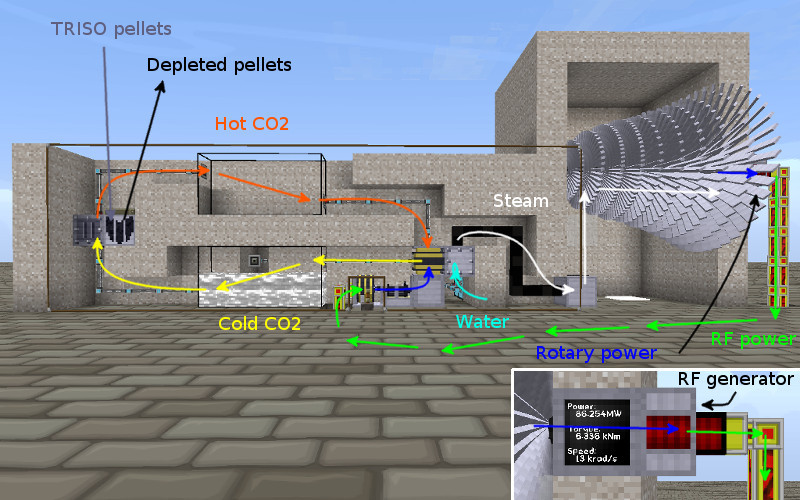
- Water: just regular water. It’s turned to steam by the heat exchanger.
- 'CO2: carbon dioxide gas. Regular carbon dioxide, normal carbon dioxide, cold carbon dioxide. All the same. Point is, it’s not hot.
- Hot CO2: hot carbon dioxide gas. This is what cold CO2 becomes after it’s put through a CO2 heat exchanger.
- TRISO fuel pellets: these go into the reactor core and turn into heat. Also referred to as fresh pellets. Will become depleted pellets after a while.
- Depleted TRISO fuel: these have to be removed from the reactor core to make space for more fresh pellets. You can make a hazmat suit out of them.
- Heat and temperature: these are used interchangeably. This is wrong in reality but since things are somewhat simplified here it works. Parts of a reactor transfer degrees celsius to each other, not joules .
Mixing and matching[]
You can always extend a reactor by adding more parts. If you need more energy, just build another reactor module. If your heat exchanger can’t keep up, build a second one. Just make sure to hook it up properly, and use the performance numbers (this how-to is full of them) to make sure you’re upgrading whatever is your current bottleneck. You can match up the most important blocks like this:
| Pebble bed reactor core blocks | Steam boilers | Steam grates | ||
|---|---|---|---|---|
| 1 | = | 0.28 | = | 0.56 |
| 3.57 | = | 1 | = | 2 |
| 1.79 | = | 0.5 | = | 1 |
Here are two examples (the designs are explained later):
- Minimal: reactor core design A1 or B1 (one pebble bed reactor core block), heat exchanger design A1, and one turbine. The turbine will not receive full steam, but this is the smallest (and cheapest) fully working reactor. You can see an example in Figure 1.
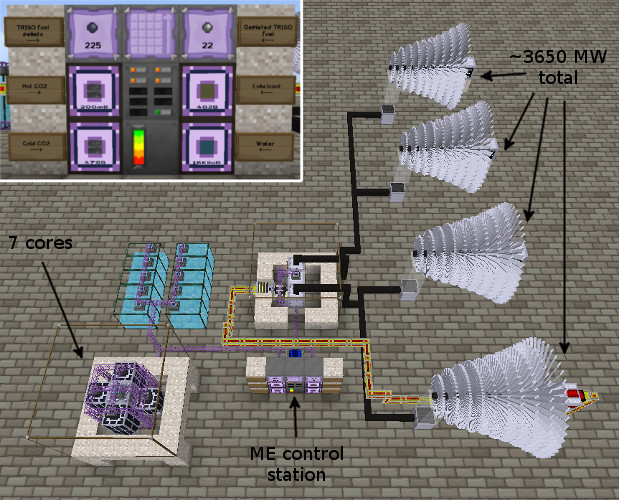
- Quadruple: reactor core design B4, stacked in a double layer, with one reactor missing (so a total of seven pebble bed reactor core blocks), heat exchanger design A2, four turbines. The parts of this setup match up nicely, everything is almost at full capacity with the turbines running at about 97%.
Things that don't work[]
TL;DR: just skip this part.
Things that don’t work - or, why do we need all these parts?
Skip the entire CO2 loop[]
You might wonder why we don’t just put the steam boilers right next to the reactor core and skip the CO2 step. The reason is simple: the reactor core gets confused and refuses to heat up. I’m not sure if this is a bug, but it simply doesn’t work.
A CO2 heat exchanger but no CO2 loop[]
How about putting a CO2 heat exchanger next to the reactor core, and then a steam boiler next to the CO2 heat exchanger, effectively using the CO2 heat exchanger itself as a heat conductor? Yes, this actually works - but it’s rigged. The setup will explode as soon as the boiler reaches 300 C, which is way below what it can take normally. If your water supply breaks or can’t keep up, you’re in trouble, so it’s not safe and doesn’t conform to our criteria.
- Besides, it feels like cheating. This setup isn’t how the reactor is supposed to work.
Skip the reactor core[]
How? By using the nether. The nether has an ambient temperature of 300ºC (at least as far as ReactorCraft thinks), more than enough to boil water. However, the steam boiler only boils if it’s more than 50ºC above ambient temperature, so you can’t get infinite heat out of the nether.
Plumbing[]
TL;DR: Use ReactorCraft steam lines for steam. Use Thermal Expansion Fluiducts for everything else unless you can afford Ender IO Fluid Conduits, then use those. Skip the rest of the plumbing section.
About plumbing[]
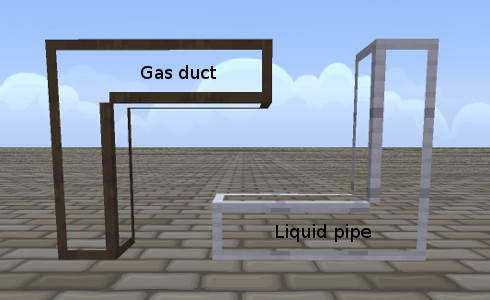
For this reactor you need to move hot CO2, cold CO2, water, and steam around. Steam can only be moved by ReactorCraft steam lines. As for the rest, if you want to stay with RotaryCraft you can use the liquid pipes and gas ducts it provides, but those are quite slow at moving things around. Their throughput and capacity is also not as easy to calculate as that of other pipe systems.
- FTB Monster has at least a dozen different ways of moving liquids around. I haven’t fully evaluated them all, so I suggest you use whichever you like (or understand) best. That said, I’ll briefly discuss a few options here.
- Note: if you build anything where the performance numbers I give here matter, you should verify them yourself. Like I said, I haven’t fully checked everything, and things may change from version to version, from modpack to modpack, and from server administrator to server administrator.
- If you can’t figure out how to use some of these plumbing systems (which is quite possible as certain things are not very intuitive), find a how-to or mod spotlight. Explaining that in detail is beyond the scope of this how-to.
RotaryCraft (CO2 and water)[]
Liquid pipes and gas ducts are what you need if you stay with RotaryCraft. Water goes through liquid pipes and both types of CO2 go through gas ducts. They are fairly slow and tend to store a large amount of fluid before letting anything out at the other side, especially if the connections get long.
RotaryCraft (steam)[]
RotaryCraft steam lines are the only thing that can transport RotaryCraft steam, as this steam isn’t a fluid.
- Every steam line block has its own internal steam “tank”, which can contain an infinite amount of steam. Every tick, a steam line will try to grab all steam from adjacent boilers, and then it will try to take steam from adjacent steam lines in order to reduce the difference in their steam amounts. Similarly, the other steam lines will try to take steam from this block (before or after, depending on how Minecraft has happened to schedule them).
- If no steam is taken out of a network of steam lines, eventually they’ll all contain the same amount of steam (give or take a little, as they can’t divide one steam into parts). If steam goes in at some point and is taken out at some other point, the steam lines will end up with a pressure gradient and steam will move through them.

Thermal Expansion[]
This mod provides you with Fluiducts. It doesn’t matter if you use regular or opaque versions, but presumably the opaque ones cause a little less lag.
- Fluiduct networks will store 10 buckets of CO2, or 3 buckets of water, per fluiduct that connects to something else. It doesn’t matter how long your network is. Fluids are instantly available everywhere.
- A fluiduct connection with a servo installed can extract 400 mB/t of CO2, or 120 mB/t of water, from a connected container. A fluiduct block can distribute this same amount per tick among its exit connections.
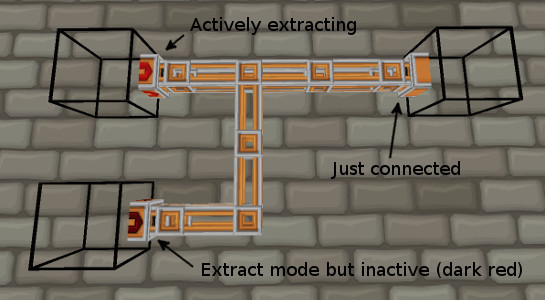
- Usage hints: whack connections with a wrench until they look right. Install servos by right clicking a connection with a servo in your hand. Get to the configuration UI by right clicking a connection with an empty hand. The redstone control settings are in the red box hanging off the right side. You’ll usually want control status set to disabled, making it pump continuously.
Ender IO[]
This mod provides you with Fluid Conduits and Pressurized Fluid Conduits. If you choose to use them I suggest you go with the pressurized ones as they can move fluids against gravity and are faster. Everything in this section assumes you use the pressurized version.
- A fluid network can store one bucket per conduit, so longer networks can store more. Fluids appear to be available instantly everywhere.
- A pressurized fluid conduit can extract 100 mB/t from an adjacent container. It can insert seemingly unlimited amounts into a container each tick, although it is of course limited by how much it can extract elsewhere.
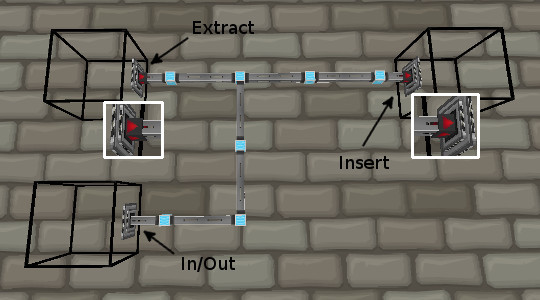
- Usage hints: whack everything with a yeta wrench until it looks right. Get to the configuration UI by right clicking conduit bundles, the big square things that touch the tanks you connect to. Usually you’ll want to set them to extract mode, with redstone mode always active.
ExtraCells[]
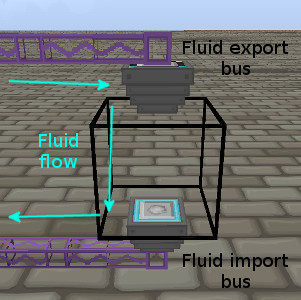
This mod, an addon to Applied Energistics, is probably the most high end option. You need an ME network with fluid infrastructure in it (a fluid disk somewhere, or perhaps a few big tanks with fluid buses).
- The storage of the ME network is limited only by how much you want to spend on it. A 64K Fluid Storage Disk can store 16384 buckets (of up to 5 types of fluid). Fluids are available instantly everywhere.
- A fluid import or export bus can transfer at one of three speeds (though it’ll always do a transfer once per second):
| Mode | mB/t | mB/s | energy/s |
|---|---|---|---|
| drop | 20 | 400 | 5 |
| quart | 250 | 5000 | 30 |
| bucket | 1000 | 20000 | 60 |
Reactor core[]
TL;DR: you can read just the TL;DR bits of the technical details but don’t skip the rest of this section. Which design you want to build depends on your resources and requirements, see #Which design to pick?.
- There are many different designs for a reactor core , each with their own tradeoffs. They all have several things in common though. There’s at least one pebble bed reactor core block, and at least one carbon dioxide heat exchanger. Furthermore there’s plumbing to move CO2 through the heat exchangers, and some way to get pellets in and out the reactor cores. Finally, you need proper application of isolation in order to not waste heat.
The pebble bed reactor core block[]
Since we’re making a pebble bed reactor, we need at least one pebble bed reactor core. You give this block TRISO fuel pellets and it will slowly convert them to depleted pellets and heat.

Technical details[]
TL;DR: core should touch heat exchanger and no air blocks. You need to feed it new pellets occasionally.
A pebble bed reactor core may contain up to 47 TRISO fuel pellets but doesn’t care how many pellets there actually are. As long as there is at least one non-depleted pellet, it works. Extra pellets won’t make it work faster and the presence of depleted pellets won’t make it work slower.
- Assuming it’s working, every tick there’s a 7% chance of a fission event, which will add 20 C (temperature) to the block. Furthermore, if a fission event happens, there’s a 3% chance that the lowermost pellet in the reactor’s inventory degrades by one step. Once a pellet has degraded 25 times, it becomes depleted TRISO fuel and is, basically, a waste product.
- Pellet use
- From this we can calculate some data. A full inventory has 47 pellets * 25 events ⁄ pellet = 1175 events before it’s empty. By statistics that should last you about 558349 ticks, or seven hours and 45 minutes. Similarly, one pellet will usually last you a bit under ten minutes, though this can easily vary by several minutes.
- Pellet logistics
- You need a way to put fresh pellets in the core, and to take depleted pellets out. You can automate this with any of the item transport mods (I recommend Applied Energistics). Insert pellets via the top and extract pellets via the bottom. The core will automatically only let you extract depleted pellets.
- If you are short on materials or time, or want a minimal build for some other reason, it’s perfectly viable to just put the pellets in by hand or maybe by hopper. Your only consideration is to not break air isolation (see #Air isolation).
- Heat production
- Some more statistics show that the reactor block will produce about 1.4 fission ticks per second, and therefore about 1.4 ticks * 20 C ⁄ tick = 28 C per second, so the cooling system needs to be able to take away at least this much.
- It’s true that there might be quite some variation from second to second, but the reactor has a considerable heat capacity so it’ll work out over a longer duration without immediately blowing things up if you ever get a (rare) second with a dozen or so fission ticks in it.
- Heat distribution
- A reactor core block distributes heat to many other ReactorCraft blocks, including ones that belong in other reactors. Generally you only want a pebble bed core to touch other pebble bed cores and CO2 heat exchangers, though.
- A reactor core block needs to be isolated from air, see #AIr isolation.
- Failure
- The reactor core block will overheat when it reaches a temperature of 4400ºC. It will turn into a block of flowing lava and any pellets in it are lost. Fortunately it doesn’t emit any radioactivity, so this is easy to recover from. Just place a new reactor core block (you don’t even have to remove the lava) and try not to overheat it again.
The carbon dioxide heat exchanger block[]
Not to be confused with the heat exchanger from Section 6. This one moves heat from the reactor core into CO2, the one from Section 6↓ moves it out of the CO2 and into water.
Technical details[]
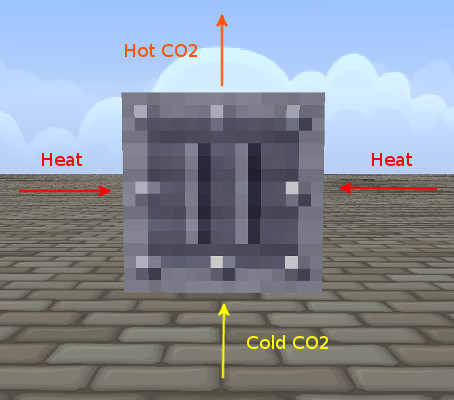
TL;DR: heat exchanger should touch cores but no air blocks. Up to four cores per heat exchanger is okay. Normal CO2 goes in the bottom, hot CO2 comes out the top.
A CO2 heat exchanger needs to be fed regular CO2 gas via the bottom, which will go into a 12 bucket internal tank (tank 0). If the exchanger is 800ºC or hotter, it’ll turn some of the CO2 into hot CO2, which will go into a second internal tank (tank 1). The second tank also has a 12 bucket capacity.
Heat transfer speed
The heat exchanger will try to transfer heat into the CO2 once each second. It will only transfer if there is at least 100mB of regular CO2 available in tank 0, and of course the block itself needs to be >= 800ºC. It will then turn 100mB of regular CO2 into 100mB of hot CO2, which lowers the temperature of the block by 117ºC.
- From this you can see that at maximum capacity, the heat exchanger can handle 117ºC per second, needs 100mB of regular CO2 per second (and can thus run two minutes without being connected to a CO2 supply if starting from a full tank), and produces 100mB of hot CO2 per second. This also means that a single CO2 heat exchanger can handle the output of just over four pebble bed reactor cores, as those would produce 28ºC*4 = 112ºC each second.
Heat distribution
Very similar to a pebble bed reactor core block, a CO2 heat exchanger distributes heat to many other ReactorCraft blocks, and needs to be isolated from air.
Failure
A CO2 heat exchanger does not appear to have a maximum temperature. Although it seems a maximum temperature of 4000ºC was intended, this isn’t actually enforced.
How to build a reactor core[]
I’ll show two reasonably good designs here, with some possible tweaks for each.
- The first design (design A) uses passive cooling and can’t overheat if the cold CO2 supply stops. However, this comes with an efficiency penalty of about 16 to 52 percent, depending on the design specifics.
- The second design (design B) runs at maximum efficiency but can overheat if the cold CO2 supply stops. There are several things you can do to reduce or even eliminate this risk though.
Which design to pick?[]
You decide. B1 is the cheapest, B4 is the best.
Safety
Design A is inherently safe. Design B is not inherently safe but can be made safe with extra work.
Performance
Two pebble bed reactor cores at full efficiency power approximately one turbine fully, but a turbine will work with less, it’ll just not run at full power. You need 50ºC/s to run a turbine, assuming no loss . B2 fully powers one turbine with a little left over, B4 powers two (again plus a little). A1 and A2 can’t fully power one. A3 can power one and (almost) a half.
Efficiency
Design A wastes some heat. Design B is 100% efficient.
Design A and B: the center[]
Both designs have a carbon dioxide heat exchanger at the center. The variations are in what touches the four horizontal faces of the heat exchanger, with the difference between A and B being the passive cooling system.
- Place a carbon dioxide heat exchanger somewhere. Make sure it’s the right type, not a regular heat exchanger.
- Hook up a cold CO2 supply to the bottom.
- Hook up something to extract the hot CO2 from the top.
| |||||||||||||||||||||||||||||||||||||||||||||||||||||||||||||||||||||