| This article is a work-in-progress. It may be finished in the near future, check its history to see previous edits. |
| “ | It's skyblock like you've never seen it before! High tech mods and full automation! Sky Factory starts the player in the void with nothing but a tree and a *single* piece of dirt between you and certain death! Version 3 adds a variety of new mods to the pack and gives the player much more choice than ever before. Pick up your achievement book today and start your journey! | „ |
| — SkyFactory's CurseForge page |
General[]
- Before we get started, this guide assumes a basic understanding of the mechanics of vanilla (i.e. non-modded version of) Minecraft, such as how to move, how to interact with blocks, how to craft, how to mine and how to attack. If you have not played vanilla at all, here's a guide for complete newcomers. Also there are lots of different paths to take. This guide only shows a good route, feel free to experiment at any point!
- When pressing your inventory key, you will see a list of all available items in the modpack next to your inventory. Use the search bar below to find what you want. Clicking on any item (also in a recipe) will show you (almost) every possible way to obtain this item! This is a good way to look up any unknown crafting recipes.
- To mine faster, there is a mod called Ore Excavation. By pressing a key, you can mine all connected blocks of the same type within a certain range, as long as you have any item in your hand. The key to press is usually the one above the TAB-Key (called Grave). It might differ between different keyboard layouts through (if you cannot find it, head to your controls, search for Ore Excavation and bind the Excavation action to any key you like). Note that this will deplete your hunger quickly, so have an eye on that bar. Watch out to not accidentally deconstruct the floor!
- In the very early game there is no need to stay at full health/hunger bars. Monsters do not spawn if a player is less than 24 blocks away from a dark enough space. This also means you do not need armor in the early game.
Building a base[]
The first steps[]
As expected, you will spawn on top of a tree. Carefully break the Oak Leaves to obtain an Oak Sapling. Make sure you don't accidentally break the block below you and the void or cut the way to the log as detached leaves will despawn quickly. If you have cleared all reachable leaves, mine your way down through the Oak Logs until you reach the dirt block. Usually, you will have 2-3 Saplings. If you could not catch any sapling or fell off you can either /give you a sapling or create a new world.
Now craft a crafting table and place it on top of the dirt block (jump). Craft your remaining wood to Oak Slabs and break the crafting table again. Now place the slabs in every direction around the dirt so anything that drops from the tree lands on them (make sure to hold the sneak key so you don't fall down). The 30 slabs you get are enough to build a 5x6 base with the dirt block in the center.
Certainly, this base is way too small, so we need more wood. Place the sapling on the dirt block and spam-press the sneak key. This causes near instant growth of the tree. Punch your way through the leaves to obtain more saplings, craft the wood to slabs and increase your base's range. Repeat this once more so you end up with a solid 9x9 base, which is enough for the start.
The wood of the next tree is used to craft a Compressed Crook which has a number of advantages over a regular Crook (e.g. more Durability). With the crook, saplings and Apples are more likely to drop, so go ahead and farm some of them (Tip: Excavate them, this is a lot faster) We will need the wood in a moment, you can make a Chest so you do not loose all your item if you fall off by now.
Getting Water[]
Once you have 30-40 saplings and a few apples its time to go on. You surely noticed the Silkworms that dropped from the trees as you used the crook. Right-click on the leaves, so they turn them into String. This will spread between the leaves so one silkworm is enough. While they do their work, craft 4 Wooden Barrels, 4 Sieves and place them. Collect the Infested Leaves with the crook (by hand won't work!) and craft String Meshes for the sieves. You can place a mesh in a sieve by right-clicking on the sieve with the mesh in your hand.
To compost Dirt, we need leaves. To collect them, we use Wooden Shears, then place them into the barrel. We then sieve the dirt, which will give us Stone Pebbles, which we can craft to cobblestone. First we will need a Furnace. Once we have it, smelt 3 cobblestone to get Stone. Use wooden planks as fuel or make charcoal (by smelting a wood block). With the stone we craft a Juicer. By now our hunger bar is pretty low and this item allows us to make apple juice out of our apples (which give us more than twice the saturation and hunger). Then craft Torches, place two of them on the ground and put two Oak Crucibles on top of them. Fill them up with leaves, which will convert to water. Meanwhile, we craft a Wooden Hammer and crush two cobblestone into Gravel, the Gravel into Sand and the sand into Dust. Right click on the filled crucible to get Clay, hammer the clay block to get 4 clay per block, which we use to craft a clay bucket. Refill the crucibles, when the water production is done, surround a two by two area with slabs and place the water inside in a diagonal shape to create an infinite water source. You can then break the wooden crucibles, you will no longer need them.
Farming Dirt faster[]
To craft the regular Crucible you need Bone Meal, which is obtainable by sieving Dust. To speed things up, we place a Spruce seed on the dirt block, which turns into a Spruce Sapling. Grow the tree and get some saplings with the crook. Now place 3 more Dirt next to your original Dirt block, making a 2x2 area. Place Spruce Saplings on all 4 dirt blocks, and then again spam-press the sneak key. This will create a giant tree. Craft a fresh Stone hammer (to have full durability so you can mine the whole tree at once) and excavate the wood with it to get wood chippings, which can also be composted to dirt. Doing this 2 times is usually enough. If you need wood later, these giant trees are a very fast method to farm it. Again, compost it to dirt (maybe place additional barrels), sieve it, craft cobblestone and once you have ~30-40 hammer it 3 times to get Dust. When hammering, place all blocks you want to reach next to each other and excavate them. This speeds up things a lot.
Getting the Cobblestone Generator[]
Getting Cobblestone this way is extremely time expensive. To always have a solid supply of Cobblestone, we now get a Cobblestone Generator. We already have water, so we now need a lava bucket. With the regular Crucible, we can get this just by placing Cobblestone into it while it is above a torch (similar how we did it with the water before). This takes several minutes, use the time to build a bigger base!
When the Lava is ready, get it into a clay bucket (it will break after usage, but that is no problem yet) and get that generator. Place a chest on top of the generator, all generated Cobblestone will land up there. Refill the Crucible, we will need more lava later.
Iron Age[]
By sieving Gravel, Sand and Dust we get ore pieces, which we can craft into chunks and smelt them to get ingots. Iron is required for a lot of machines, so let's farm it! To do so, we need a "hammer room"
That may sound complex, but it isn't. Simply build a clear area, at least 7x10 blocks wide. We will place our cobblestone there and mine it all at once for quick farming. To place blocks faster, we can now use a Stone Wand. Simply right-click on any block and it will place additional blocks next to it (if you have them in your inventory). We also use it to place down our cobblestone faster later.
Getting the Smeltery[]
A 2x2 smeltery with some molten iron inside
The Smeltery will assist us to get twice as much ores from sieving. To build it, we need Grout. 72 Grout is required, we therefore need 36 Gravel, 36 Sand and 9 Clay Blocks. As we need to smelt the grout into bricks, you should get 1-2 additional furnaces.
Then craft 9 Seared Bricks, a Smeltery controller, a Seared Tank and a Smeltery Drain. Place a 2x2 area of Seared Bricks, then surround it one layer higher (use any block to build up) with Controller, Tank, Drain and the remaining bricks (you can leave out the corners and the top layer blocks may be in any order). If you've done it correctly, it should look like the image on the right. If the controller does not emit particles, something is wrong.
Then craft a Faucet and a Casting Basin. Place the Faucet on the Drain and the Basin below the Faucet. You can input ore chunks and ingots using the smeltery controller and output the molten metals into the basin by right-clicking on the faucet. You can smelt different ores at the same time but only have one type in a basin at the same time. If needed, you can break the basin to discard anything that is inside (e.g. useful when you want to switch to a different ore)
Quick hammering[]
In the next time we will need a lot of hammers. But carrying several of them around is kind of wasting inventory space. You can make use of a Crafting Station, which will hold your items. Place it nearby your hammer room and split one stack of cobble and a stack of sticks on it. Now, every time you are done placing your blocks, grab a hammer and smash them. A stone hammer has enough durability to get through 2 stacks of cobble, so the fastest procedure to get gravel is:
- Get exactly 2 stacks of cobblestone into your inventory
- Place it in your hammer room with the help of a wand
- Grab a hammer from the Crafting Station and excavate
- Collect the gravel and throw the 1-durability-hammer overboard (the last durability will drop cobble instead of gravel anyway)
Sieve your gravel, craft the pieces to chunks (use your inventory crafting grid) and put them into the smeltery. Once you have your first iron block, use it to craft a hopper running into the smeltery controller. Now you can just input your iron chunks in the hopper and they will get smelted automatically. Craft new sieves and get iron meshes inside them. I usually go with 16 iron-mesh sieves, so I can sieve a stack in 4 turns (using less is also fine through).
Diamonds![]
Iron Meshes give us a 1% chance to obtain a diamond when sieving gravel. While you might be tempted to craft diamond gear, craft a Diamond Wand instead. This allows us to place more blocks at once and it does have a much higher durability, thus speed up iron farming. We will need a couple of diamonds later for diamond meshes, which allow us to get a steady supply of them.
Automation[]
Building a lava farm[]
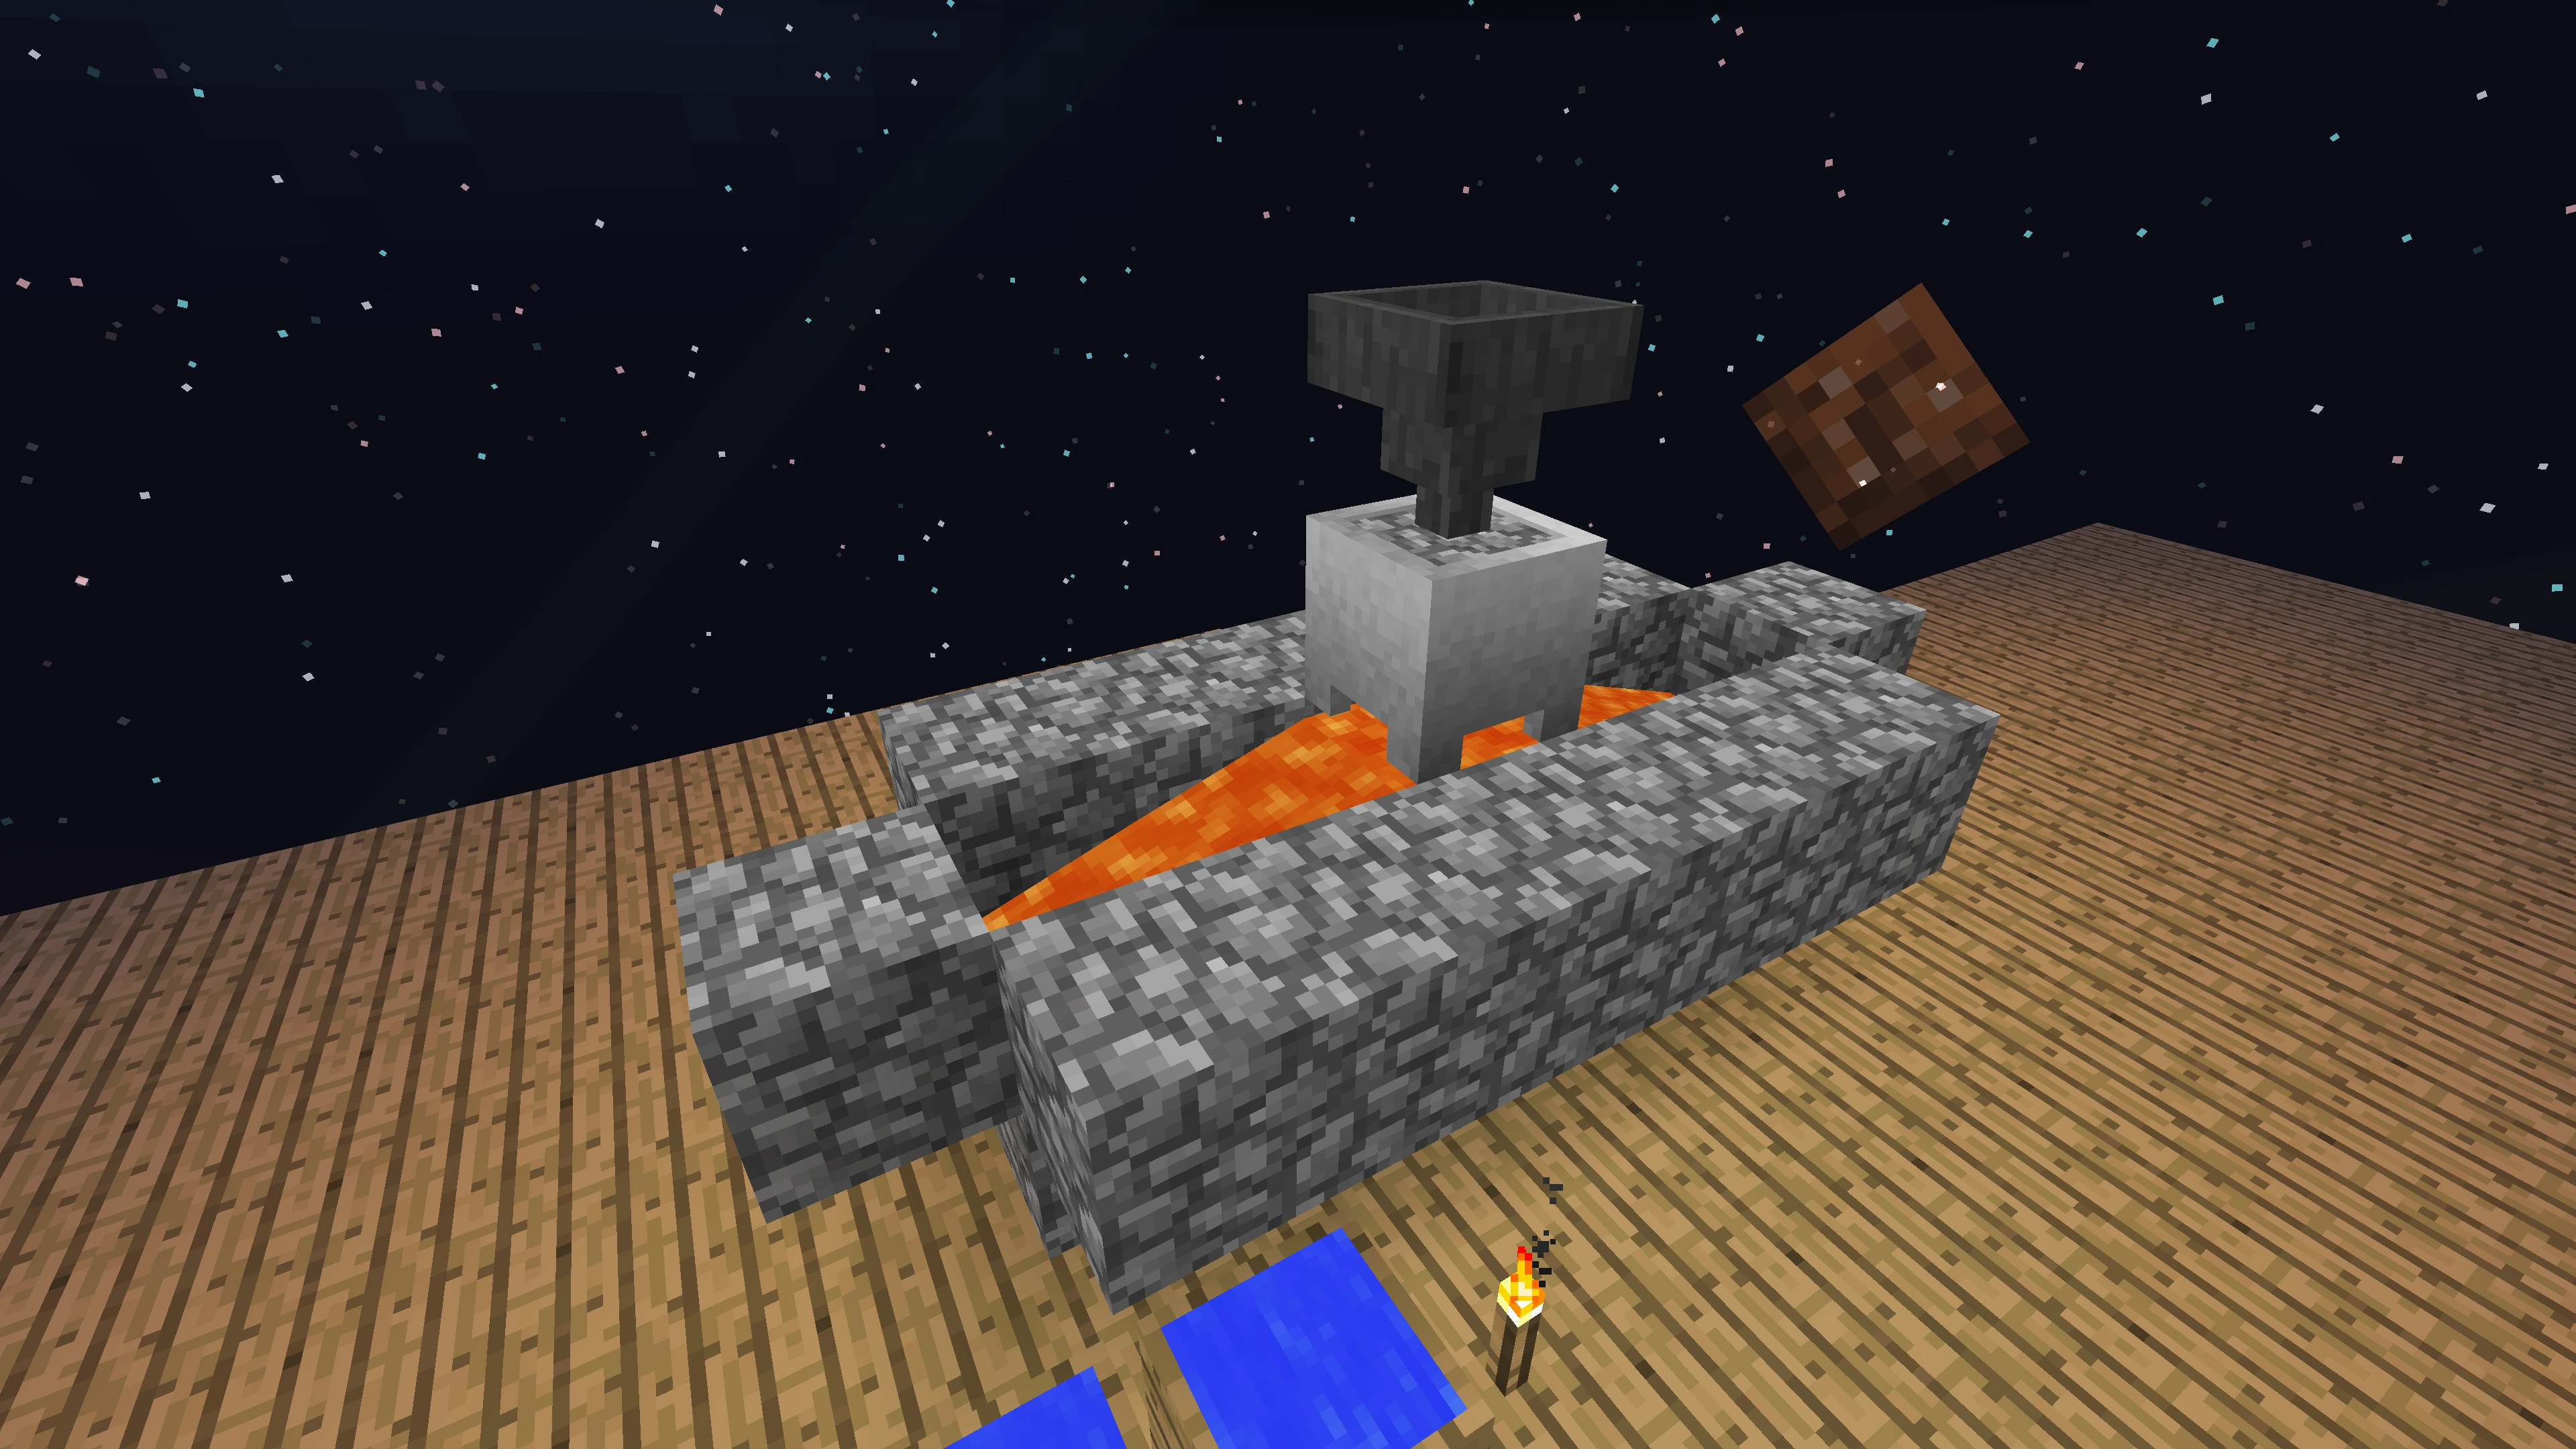
Lava will be our first type of fuel to automate. The simplest way to farm a decent amount is to encase a 1x5 area with cobblestone and put a lava source block in the middle so it fills the area. (more than 2 tiles away from the source block it will decrease the Crucible's speed through) Then place your Crucible over the lava, which will give it a 3x speed boost.
Next we will need a Stirling Generator to get some energy. This requires 1 Redstone for the piston, so we need to sieve some dust through our iron meshes. At the time of writing there is a bug which causes redstone to not land in your inventory but instead somewhere random in your base, so keep an eye out. Place the generator next to your lava farm and deposit a lava bucket to start producing Redstone Flux (RF).

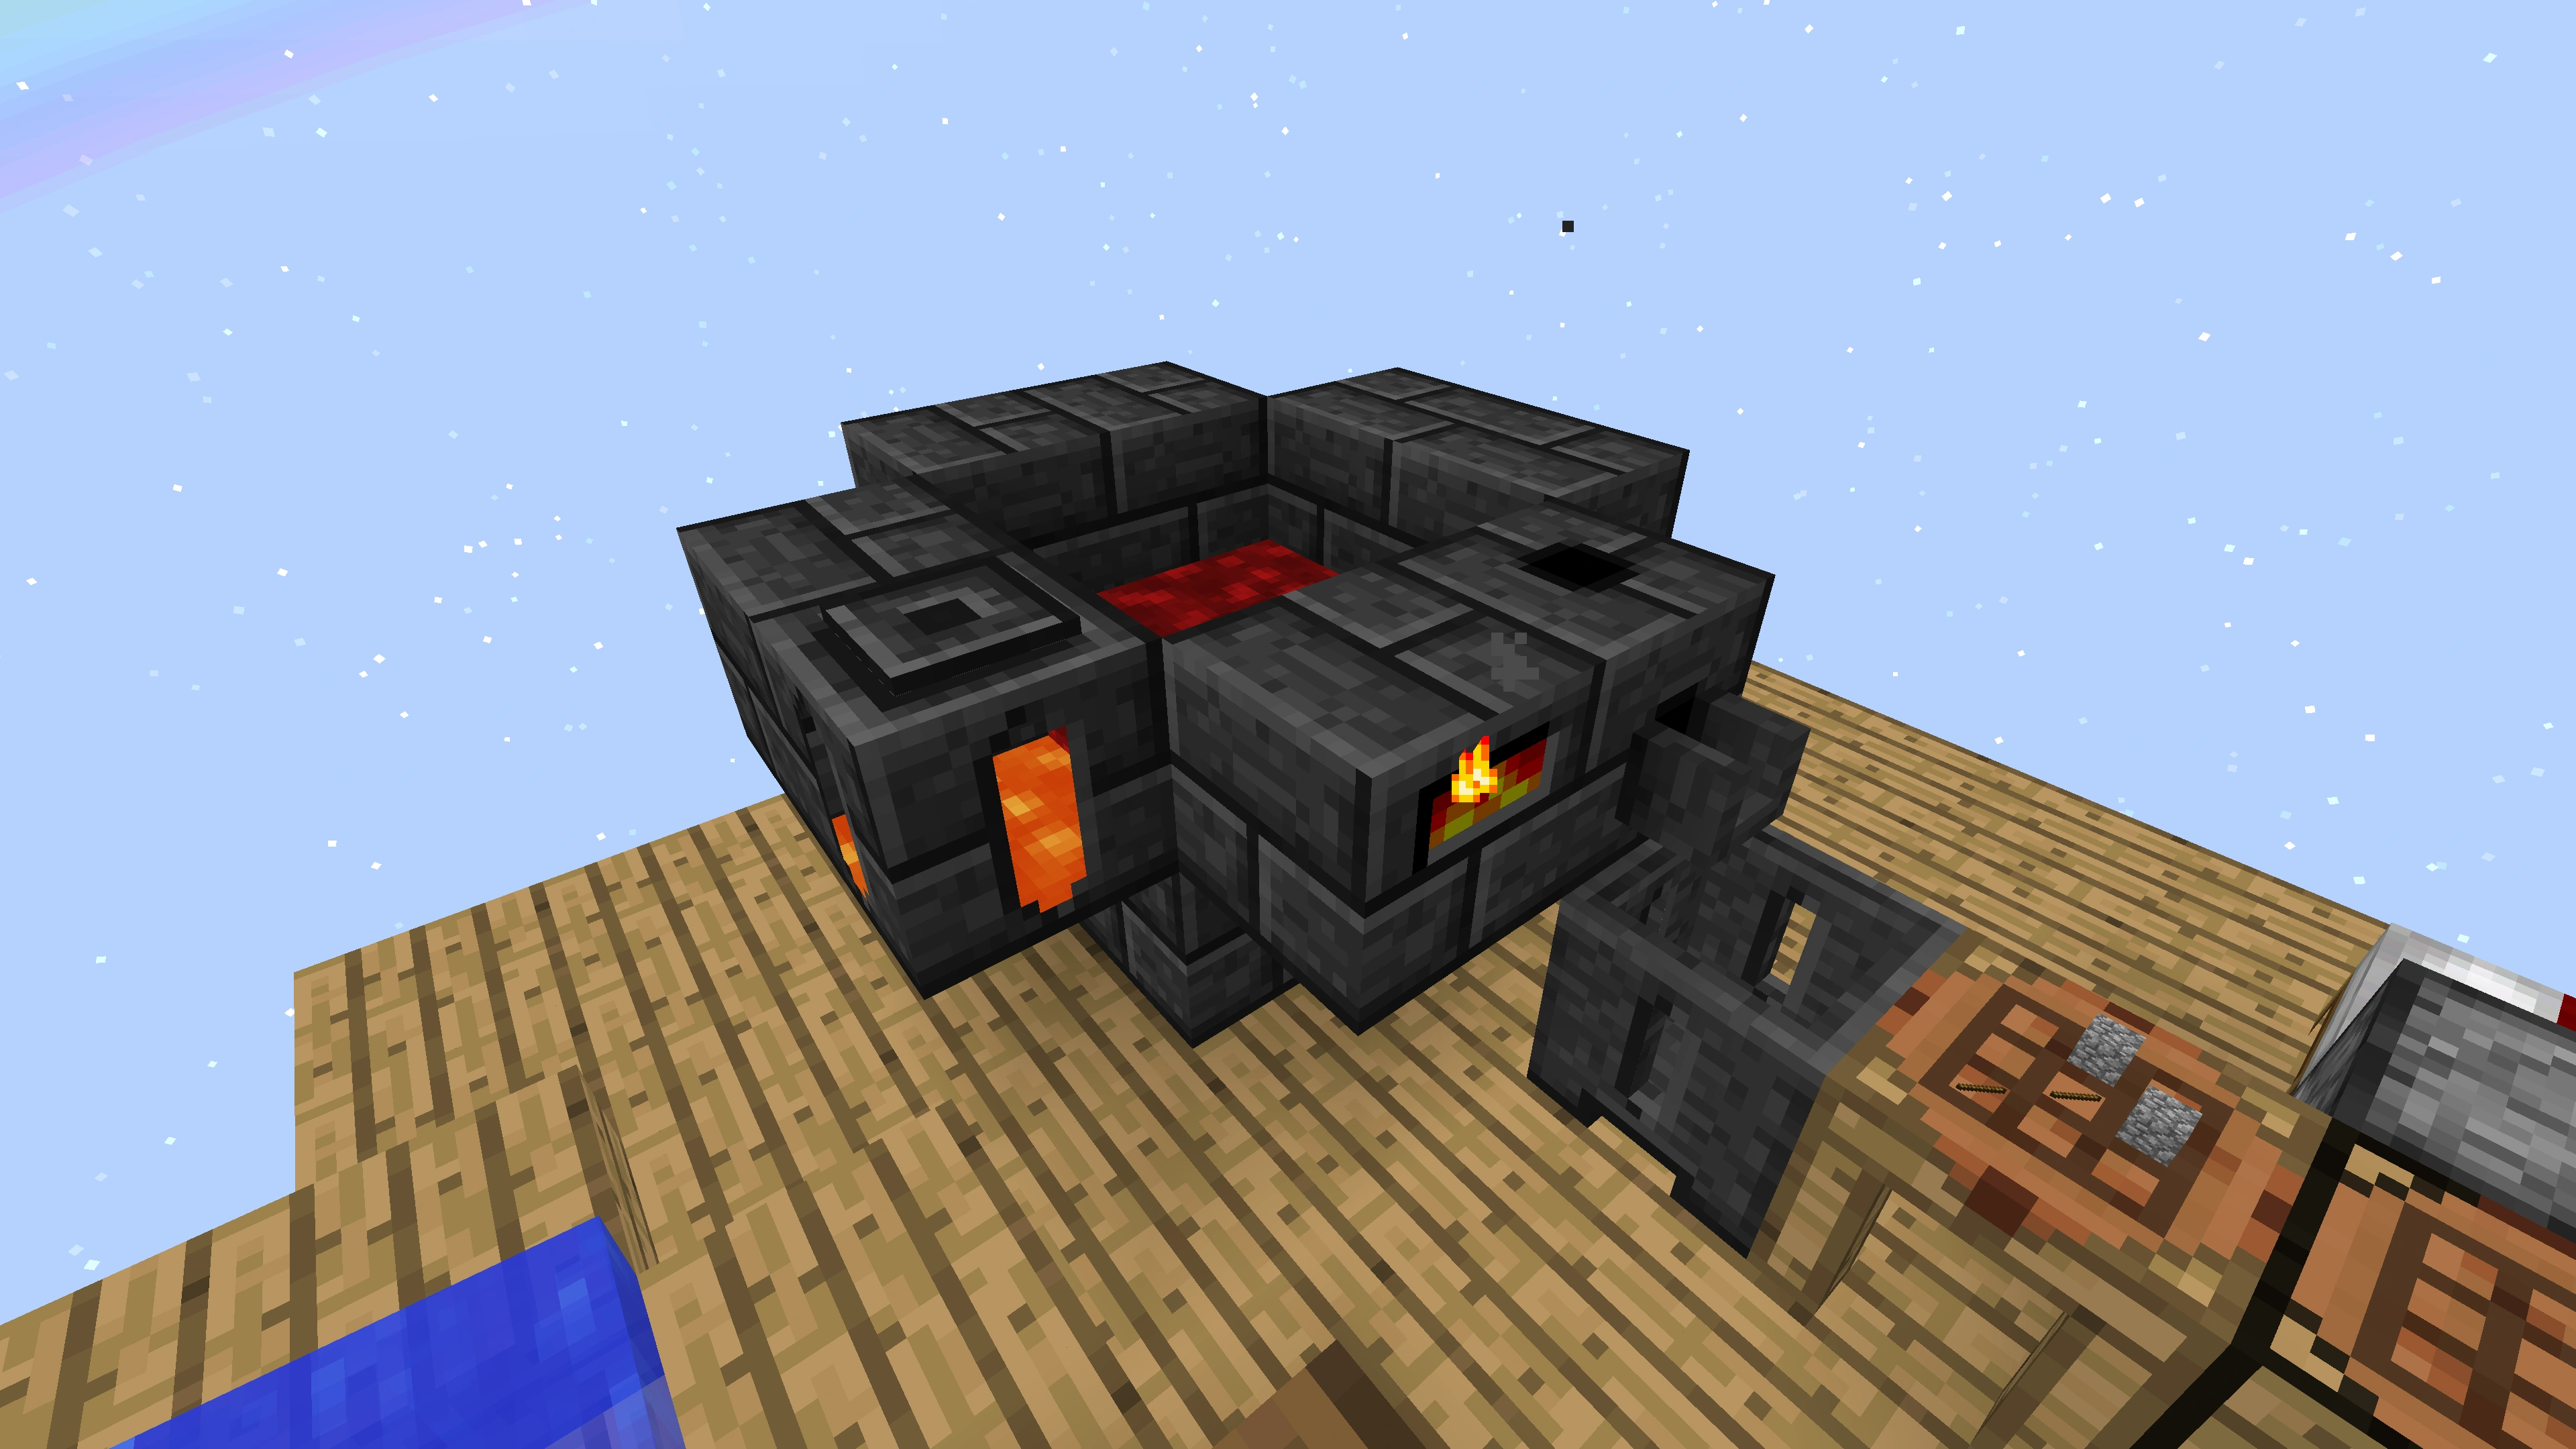
The lava farm setup
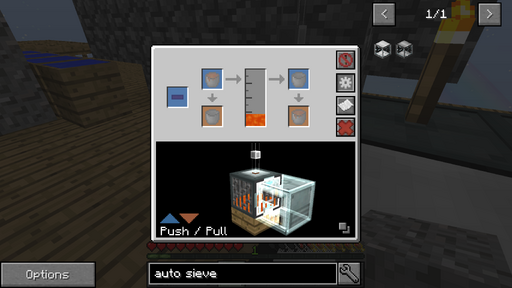
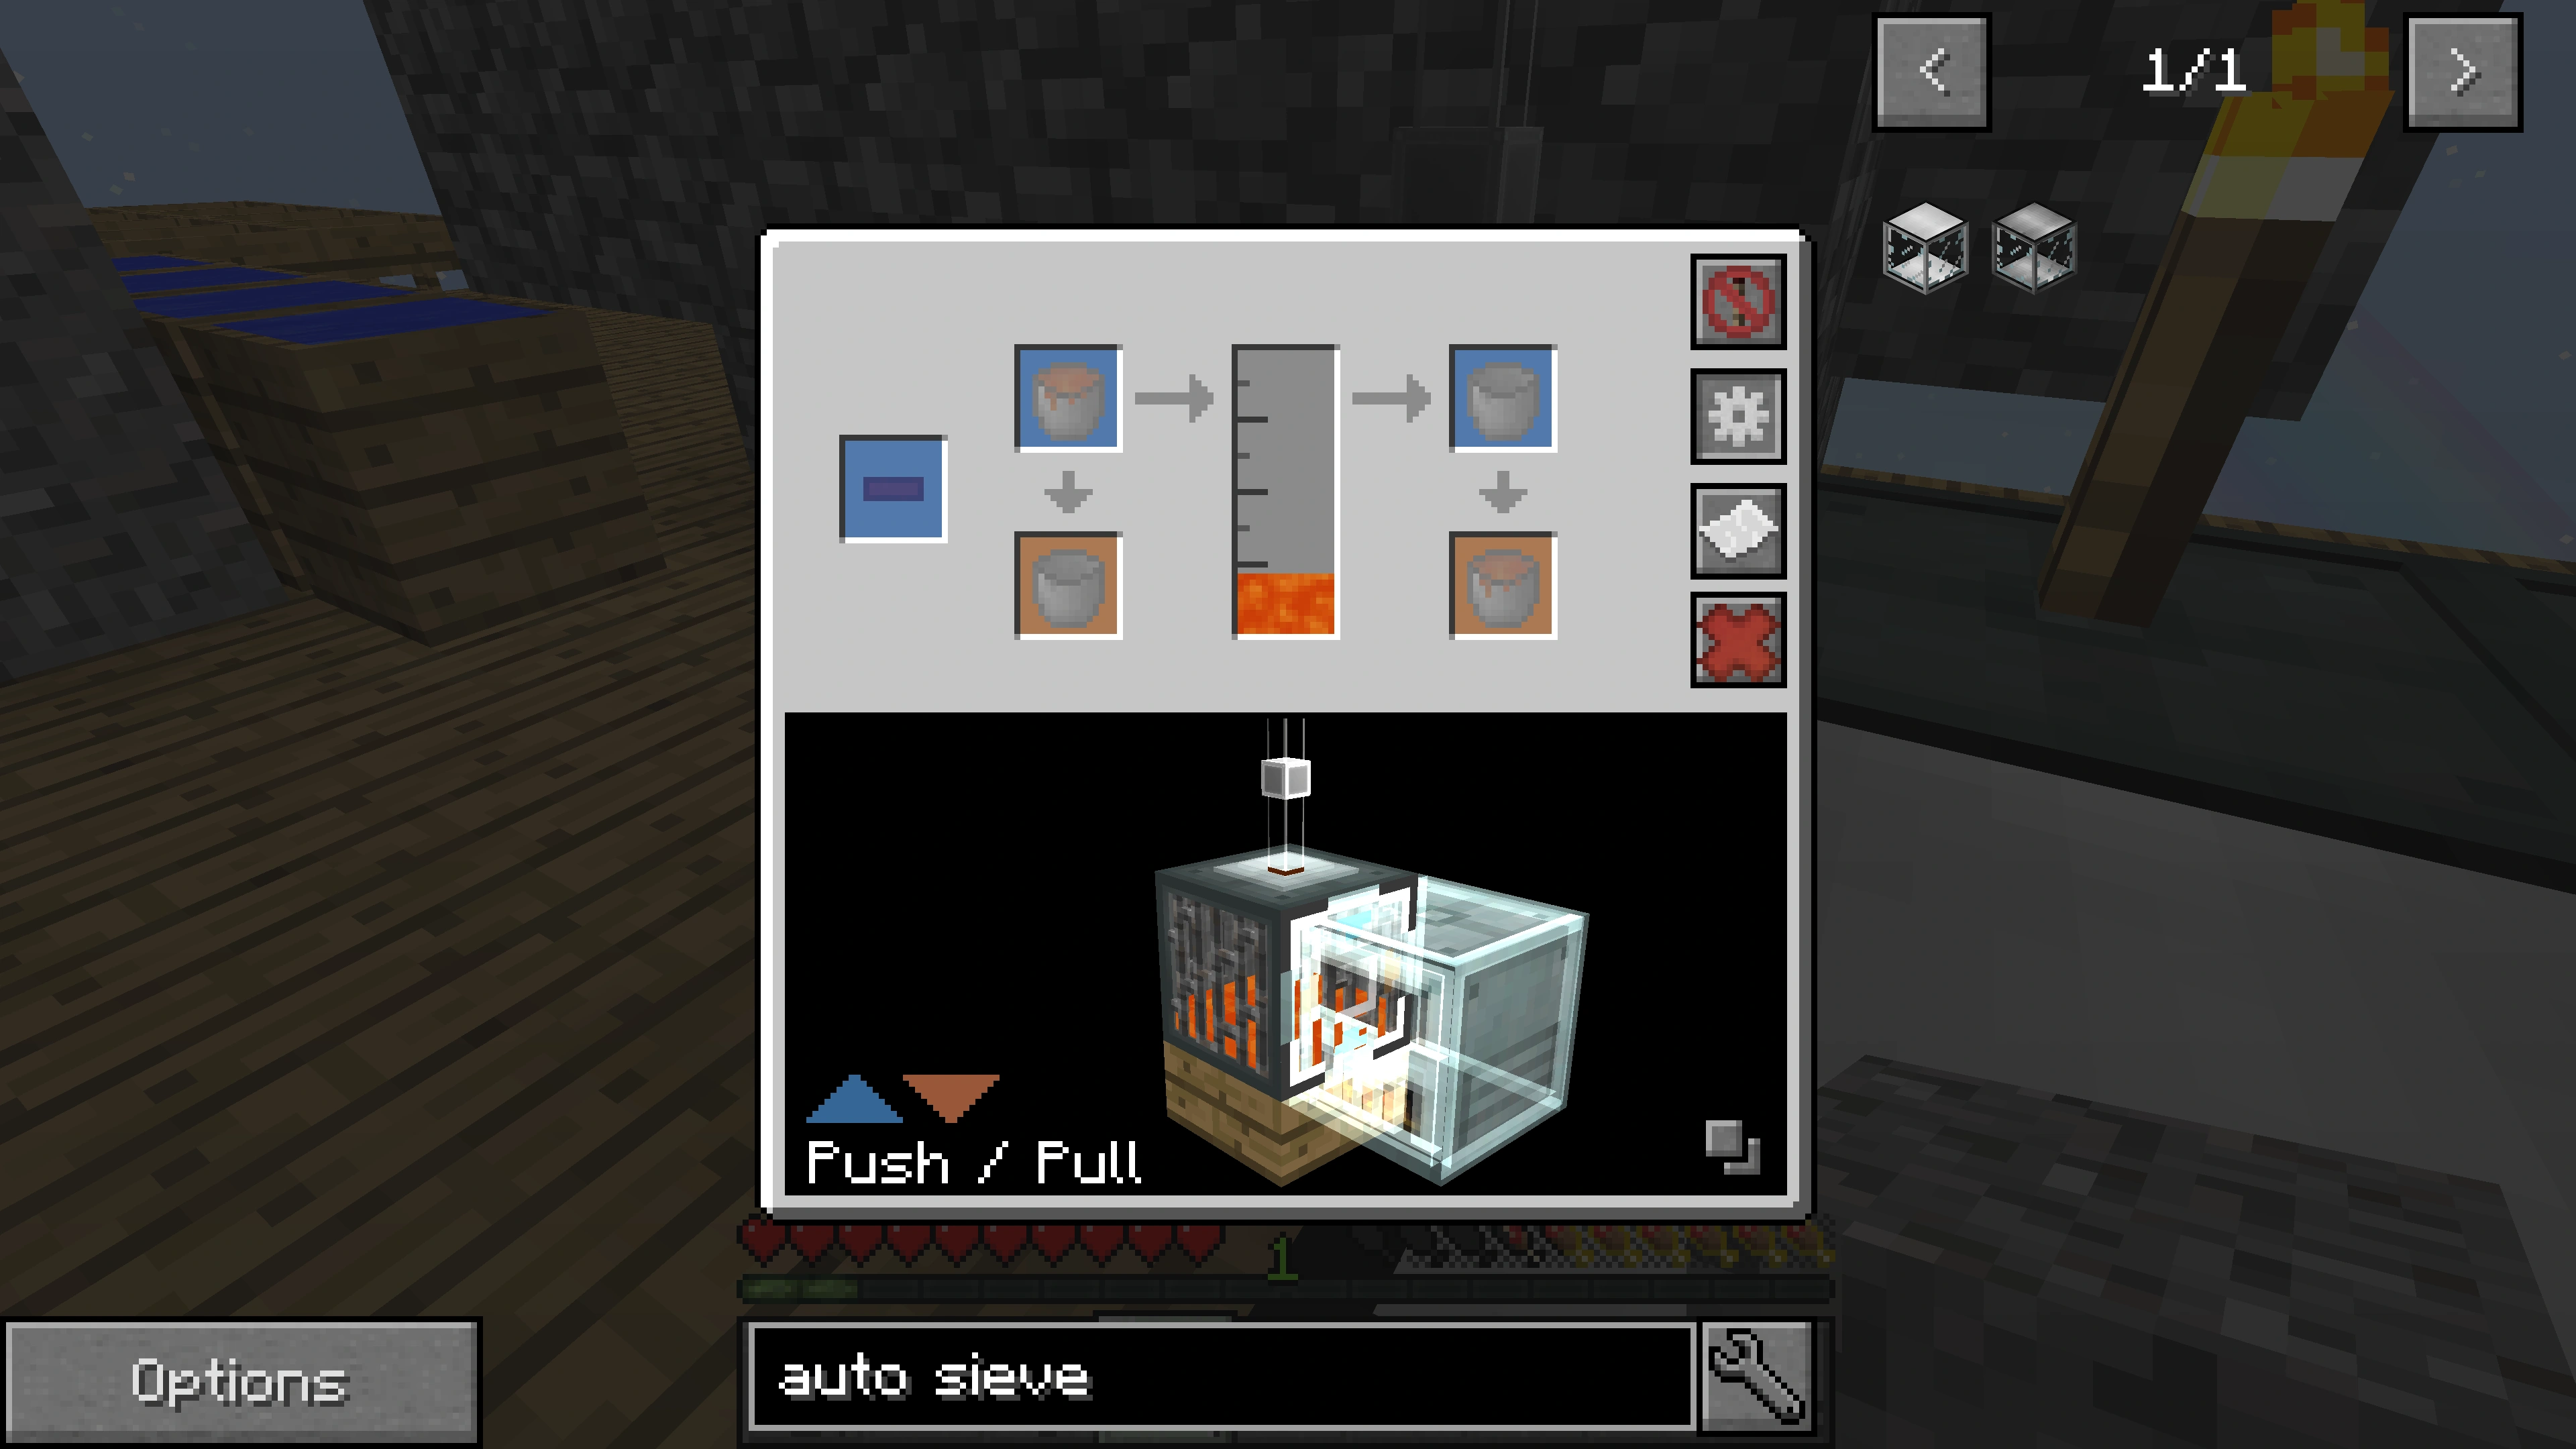
Correct setup of the fluid tank. Put the empty bucket in the right blue field.

The lava farm connected to a fluid tank, which feeds a Stirling generator (torch on top) to power an Alloy Smelter and an Auto Sieve

If you want more power, you can craft a coal generator and put in the coal you get from sieving. The RFTools variant is producing more RF/tick, but the Actually Additions variant generates more energy from a single coal and does not require redstone (which is quite a pain at the beginning).
First machines[]
The lava needs to be regulary refilled. To automate this, we need different metals (Copper and Gold). Drain all iron into your casting basin. If it does not get full, put some more iron (1 ingot equals 144 mb, chunk twice as much) in the smeltery (or just break the basin and place it back). If you put a multiple of 9 chunks in it, this will result in no remainders (2 blocks/9 chunks). With the copper and the gold we can craft an Alloy Smelter. This allows us to gain a lot of materials we'll need to automate different processes. Put in 3 glass to make 3 Quite Clear Glass. Then craft Fluid Conduits. Place a fluid tank next to your stirling generator and connect it with your crucible. Right-click on the connection on the crucible and set it to "Always active" (torch symbol). The lava should now flow into the tank. Open the tanks menu, click on the gear, move the view until you see the side next to your Stirling generator. Right-click the side in the view until it says "Push/Pull". Now just put an empty bucket in the tank, which automatically gets filled up, sent to the generator and pulled back empty.
Congratulations, you just built your first machine which will steadily generate 20 RF per tick!
Auto Sieving[]
With our now fully automated power source, we can automate the sieving. Craft an Auto Sieve and place it next to the Stirling generator. Put in a Diamond Mesh and start sieving some dust for redstone. Put a hopper on top so you can input more. We can now let this run while we more on to different tasks. Craft an SAG Mill to make some coal powder. Be sure to put some flint inside, which will increase the output. Craft a Double-Layer Capacitor, which will upgrade our Stirling generator to produce twice as much RF per tick. Then place an Auto Hammer on top and connect it to the generator with an Energy Conduit. Now put a hopper and a new cobblestone generator on top. The result is a slow, but full automatic diamond farm (~1 in 5 min). Switch to a iron mesh if you also want iron (but you will get 3 times less diamonds).
Now place another generator next to the tank (you needn't build another lava farm, the lava output of one crucible is sufficient for several of them).