This guide was originally written by Flaxbeard, the developer of Cyberware, and later transferred and formatted for the wiki.
Setting up shop[]
To get started with Cyberware, you'll need to obtain two blocks: the Robosurgeon and the Surgery Chamber. The Robosurgeon can be found inside chests within Nether Fortresses. The Surgery Chamber can be crafted like so:
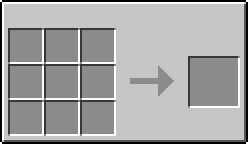
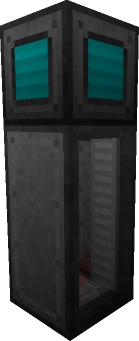
To assemble a working Surgery Chamber, place the Robosurgeon on top of the Surgery Chamber.
Tracking down cyberware[]
The next step to augment yourself is to find some Cyberware. Chances are, you've probably encountered some Cyberzombies already, and perhaps you've even gotten a few pieces of Cyberware from them. You'll want to arm yourself and hunt Cyberzombies, which have a chance to drop pieces of Salvaged Cyberware. They look like this:

Once you've gotten a few pieces of Cyberware, decide what you want to install. Make sure you press shift to see more information about the piece of Cyberware. If you want to install Cyberware that consumes power, make sure you have another piece of Cyberware that generates it, like a Cardiovascular Coupler, Solarskin, or a Metabolic Generator.
Augmentation 101[]
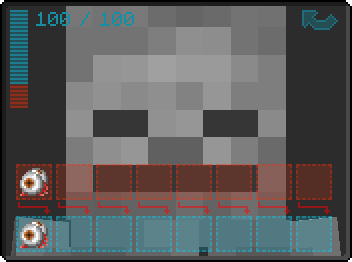
To start augmenting, right click your Robosurgeon to open the GUI. You'll be faced with a screen that looks like this:
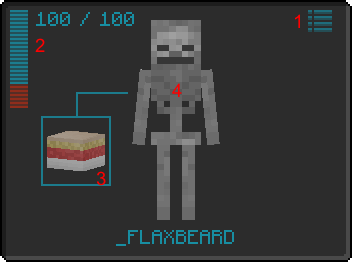
It's a lot to take in at first, but let's go over what each part means.
- This is the index button. You can click this to see a list of what Cyberware you have installed, and information on what Cyberware you're adding or removing.
- This is the Tolerance bar. You have a finite amount of tolerance, which is lowered each time you add a piece of Cyberware. Thankfully, you can remove Cyberware to get this tolerance back, but make sure you don't let this bar reach 0 or you'll die when you perform the surgery.
- This is the flesh cross-section. You can click this to access the Muscle, Skin, and Bone slots.
- This is your body. Click on the Head, Torso, Legs, or Arms to access their slots.
Click the appropriate body part to bring up another view, which should look similar to this:
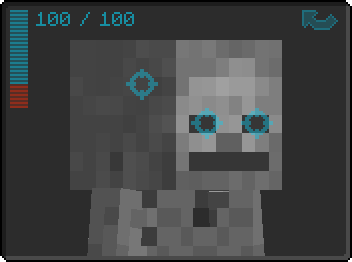
Each blue target symbol represents a slot. In the case of the head, the slots are for your Eyes and Cranium. You can click a target symbol to go to that slot.
The top row of slots lists the items you currently have installed, and the bottom row shows the items you will have following the surgery. To remove an item that's installed currently, simply click on it on the bottom row. Clicking the now-blank slot will re-add that item. To add in a new item, either replace an item on the bottom row, or place it in an empty slot on the bottom row.
The last thing you need to do before performing the surgery is to check for warnings. You can do that by looking for this icon in the top right of the Surgery GUI.
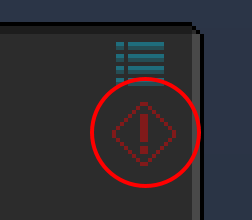
If you see this icon, mouse over it to see what's wrong.
To finalize the surgery, exit the GUI, walk into the Surgery Chamber, and then close the door. Make sure you're close to full health before performing a surgery!
The virtue of tolerance[]
The Tolerance meter in the Robosurgeon tracks how much tolerance your body has for alien components. If this reaches 0, you will die. If the Tolerance meter dips below 25, you will suffer from Rejection, which will slowly kill you. The only way to stop rejection is by injecting Neuropozyne, a rare drug found in dungeons and other ruins. One shot of Neuropozyne will last you a day.
Charging up[]
If your power needs aren't being met, it might be a good idea to craft a Cyberware Charger, which takes Redstone Flux (RF) or Tesla energy and feeds it into your internal batteries. Craft it like so:
Stand on top of the Cyberware Charger in order to wirelessly charge.
Reverse engineering[]
Now that you've performed your first surgery, you can start to think about making your own Cyberware. Unfortunately, Cyberware isn't the simplest to craft, and without the aid of a Blueprint you won't be able to replicate it. There's two ways you can go about obtaining this Blueprint, the Engineering Table and Scanner.
The Scanner is the cheapest way of obtaining Blueprints for Cyberware, but it requires time. To craft a Scanner, you'll need to use a Cybereye that you salvaged from a Cyberzombie.
To use the Scanner, insert a piece of paper into the leftmost slot, some Cyberware next to it, and then wait. The more Cyberware you have in the Scanner, the greater the chances it will output a blueprint. The Scanner requires a full Minecraft day to process, so it's a very slow but costless way to get Blueprints.
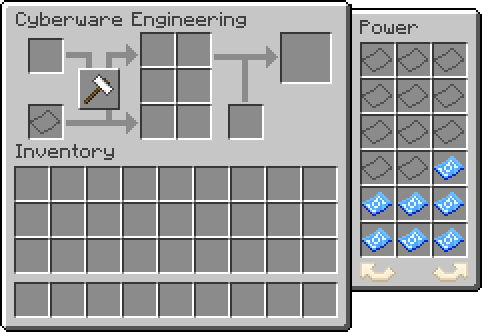
If you're sick and tired of waiting for Blueprints, you might consider crafting the Cyberware Engineering Table, which is used to deconstruct and craft Cyberware. It is crafted like so:
To use the Engineering Table to deconstruct Cyberware, place it in the top left slot and place paper in the bottom left slot. Mousing over the button will display the chance to obtain a blueprint. Clicking the button will destroy the piece of Cyberware, yielding several Components and perhaps a blueprint.
Once you've obtained a blueprint using one of the two methods, you're ready to try...
Replicating Cyberware[]
Once you have a blueprint, you can use it to craft a piece of Manufactured-grade Cyberware, which has a much lower Tolerance cost than its Salvaged counterparts. To do this, insert the blueprint in the bottom right slot in your Engineering Table, place the ingredients in the center slots, and take the Cyberware out of the rightmost slot. The blueprint is not consumed. It's that easy!
Next steps[]
You've learned all you need to know about getting started with Cyberware! Looking for more to do?...
Hoarding Cyberware[]
Interested in obtaining more Salvaged Cyberware? You've come to the right place!
The easiest way to obtain more Salvaged Cyberware is to use the Looting enchantment on your weapons, this will give Cyberzombies a higher chance of dropping Cyberware. Sometimes, though, the number of Cyberzombies is the problem. Thankfully, Cyberware provides a way to increase Cyberzombie spawns... Radios.
Radios come in three tiers, the Cranial Broadcaster, Radio Kit, and Radio Beacon. If you are equipped with a Hudjack, you will be notified when entering or leaving the functional radius of one of these radios.
Cranial Broadcaster[]
- Main article: Cranial Broadcaster
The Cranial Broadcaster is an augment that can be dropped from Cyberzombies. It's the weakest tier of radio, but it has the advantage of being mobile. The Cranial Broadcaster will affect all mobs spawned within a 32-block range horizontally, enough to affect all mobs spawned by the player using it. It has a 5% chance to convert a normal Zombie spawn into a Cyberzombie spawn, and 50% of converted spawns will be Cyberzombie Brutes.
Radio Kit[]
- Main article: Radio Kit
The Radio Kit is an early-game radio that can be placed in the world. It's crafted like so:
The Radio Kit affects all mobs spawned in a 64-block radius horizontally, covering an impressive 3217 square blocks. It has a 10% chance to convert normal Zombie spawns inside this radius into Cyberzombie spawns. 50% of converted spawns will be Cyberzombie Brutes. You can turn off the Radio Kit by providing a redstone signal.
Radio Beacon[]
- Main article: Radio Beacon
The Radio Beacon is a late-game multiblock radio with an extensive range. To assemble one, you'll need 42 Radio Tower Components and a Radio Beacon.
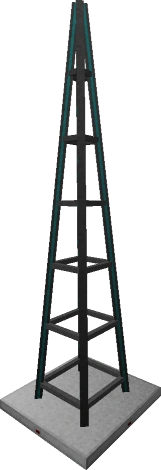
To assemble the beacon, build 4 layers of 3x3 Components, with 6 Components pillared on top, like so:
The tower will then take the form of a model, at which point you can place the Radio Beacon on top. If functioning, it will emit particles.
The Radio Beacon affects all mobs spawned in a 128-block radius horizontally, covering a massive 12868 square blocks. It has a 20% chance to convert normal Zombie spawns inside this radius into Cyberzombie spawns. 50% of converted spawns will be Cyberzombie Brutes. You can turn off the Radio Beacon by powering its base in the designated locations.
Getting organized[]
Bogged down with Blueprints? Confused with Components? You've come to the right place. Cyberware has two built in blocks to help you stay organized!
In order to manage your Blueprints, it's a smart idea to craft some Blueprint Archives. They're crafted like so:
On its own, the Archive functions much like a mundane chest that can only contain Blueprints and Paper. To use the Archive to its fullest potential, it needs to be placed nearby an Engineering Table. Each Archive near an Engineering Table can be accessed through the Engineering Table's GUI, and you can toggle between all nearby Archives! You can try organizing your Archives by slot, part type, or any other system.
To keep track of your Components, you should try making a Component Box. They're crafted like this:
The Actuator in this recipe can be replaced by any Cyberware Component. The Component Box can be accessed by right clicking with it in your hand, and is a handy place to store Components. You can Shift + Right Click to place it on the ground, and Shift + Right Click to pick it back up. When accessing an Engineering Table, all Component Boxes in your inventory and all Component Boxes placed nearby are accessible, allowing you to keep different Components in their own boxes if you so choose.
| |||||||||||||||||||||||||||||||||||||||||||||||||||||||||||||||||||||||